“Wolverine Face ” by Rishikesh Nandlaskar
Hi,
My name is Rishikesh and I am working as a 3d modeler for r a d game development company, in India. I am working on 3d for almost a year and a half after completing my diploma in Commercial arts. A self taught 3dartist, who learned 3d from books, website tutorials and good friends/colleagues with whom I am working with currently. I am feeling very happy to share my part of experience with every other 3dlover.
So without wasting any time, now lets start with the tutorial.I will not go in detail explanation, assuming that my friend (reader) has some basic knowledge of box modeling and texturing (including unwrapping) in any 3dsoftware.

3Dtutorials.sk recommendation:
To maximise the realism of your 3D characters we recommend to use high quality human photo textures from the #1 texture website www.3D.sk
STAGE01
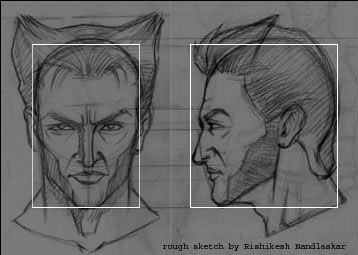
This is my favorite way to model any character. I started the model using a box in max over my hand drawn rough sketch of the wolverine character.
STAGE02
I converted the geometry into editable poly and using extrude poly, added segments to it (only half face to start off with). To get the basic shape of the character I moved the required vertices to match my drawing in the left and front viewport and simultaneously checked the model in the user viewport.

STAGE03
With a reasonable amount of satisfaction with the basic shape I selected the polys of the flat side of the half head and deleted them. Now I copied the half head in a reference mode and flipped it to get the full head shape. So that the changes made on the original half head shows same changes on the reference head. I applied mesh smooth modifier to the original head and worked in the toggle mode whenever needed for further modifications.

STAGE04
Next, using cut and welding tools I started shaping up the model and tried to get the loops of the polys right as far as possible .

STAGE05
After modeling the head I started modeling a separate ear and then welding it with the head. After attaching the ear I started adding details to the overall model.

STAGE06
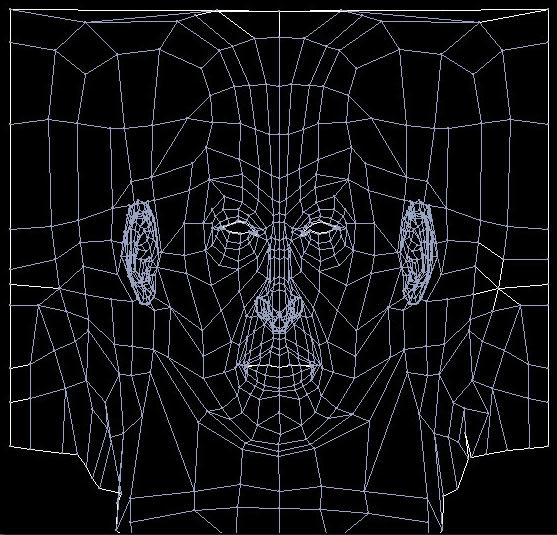
I decided to Texture the model first before moving onto anything else. Applying an unwrap modifier I unwrapped the face into a flat clean wire frame and then taking a print screen of the wireframe and I bought it in photoshop to paint the Texture.

STAGE07
Using a basic skin texture I worked over it in Photoshop for further enhancements and at the same time matched the texture to go with the wireframe. I kept checking the changes on the face model in max. When the texture was mapped almost perfectly on the face I started of with the bump map for the face.

STAGE08
For the face map, which was slightly grainy, I directly desaturated the original skin texture and started off marking the bump areas as shown in the image.
Under the maps parameter in the bump slot I applied the bump texture with a value of 30. Then for further details I added dark lines for wrinkles. I carried on the texturing process for quite sometime and managed a nice texture.

STAGE09
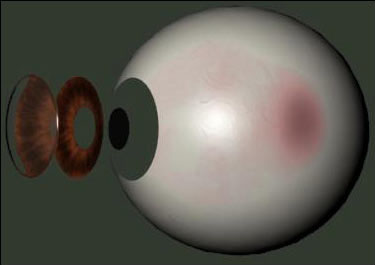
For eyes I modeled it in detail i.e. the white-eye, cornea, iris and pupil.
STAGE10
Now for the hair part which was the most challenging part so far, I used shaghair plugin . I first decided on which areas needed hair and then made a copy of the head and detached different parts and named properly for convenience.Then I unwrapped each detached element and placed their unwrapped wireframes in photoshop.


STAGE11
Now back in Max I concentrated on each detached element. I will try to explain one part of the detached element in detail. Other parts were worked out in similar method.

STAGE12
I will explain you the beard portion. In photoshop, I then painted dark and the bright areas under the reference of the beard wireframe. I applied this map with a material ID to the beard element.
Using the same ID in the shag hair roll out under the length multiplier submat ID prevents even alignment of the hair, as the hair that would render on brighter areas would be longer than the hairs that would render on darker areas.
Different curved lines were drawn on the detached element named beard left. After I was satisfied with the arrangement of the lines, the first thing I did was to select all the lines of the particular detached element and name them in name selection set. Girls in front of the webcam arrange an erotic show in real time you can see your interlocutor to communicate inside the text chat, join a free webcam girl without registration you are welcomed by free chat! you are in the 24/7 zone of the hottest video. Communication Live sex where you are happy to spend your time intimate for all restrictions. Dating online still want sex. Hundreds of models are ready to chat with you at any time of the day or night.

STAGE13
Model hair modifier was applied to the selected lines and the detached element named beard left was converted to editable mesh. Because under the face level selection in shag hair; the selected polygons needs to be of editable mesh. I selected the polygons to the front of the beard element and named it in the name selection set.
STAGE14
Choose Rendering > Environment, add shaghair and also shagrender . Now choose shaghair and name it as beardleft hair. In the object, copy/paste, load/save
1. Choose pick emitter to select the beard left element. Click the face level and then select the nameselection and choose the name of the polygons selected earlier.
2.Under the model hair pick all the lines selected for the beardleft.

STAGE15
For parameters section you may refer to the image shown where I have used my own experimented and tested figures and also see the test render of the beard left.

STAGE16
Using the same method, the rest of the hairs were done. But to get the hairs right,I had to spend many hours getting them right.

STAGE17
Final result achieved (only 2 omni lights were used in the scene and rendered on default scan line renderer).

if you have any suggestions/queries please mail me.

(c) Rishikesh Nandlaskar, rishikesh.nandlaskar@rediffmail.com


Latest Comments