“The Making of The Tower ” by Manuel Molnar
This artwork was inspired by the work of Lee Dunnette AIA; He really inspired me and that is the reason why I made this 3d version of his work, I called it “The Tower”. This also reminds me of my last travel to Italy where I saw the magnificent Architecture and great places that I only saw in the book.
3Dtutorials.sk recommendation:
To maximise the realism of your models and textures we recommend using high quality photo textures from the #1 texture website www.environment-textures.com
THE TOWER

In this project I gathered as much photo reference that I can use.
Setting up the scene and modeling
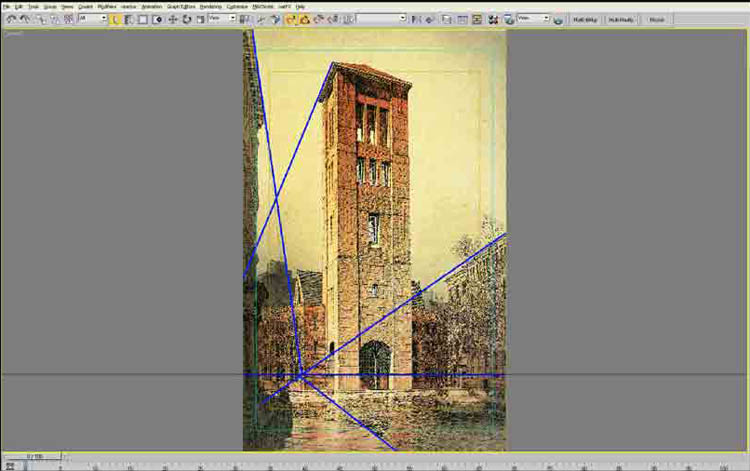
The first thing I did was to load my reference image to adobe photoshop and mark the perspective lines and the horizon; this will make it easy for me when I setup the camera in 3ds max.

Now before I start my work flow in 3ds max, I configured first my unit scale to metric: centimeters and the system unit scale is 1 unit = 1 cm. This setup is not set to stone I’m just more comfortable using it. Next is to load the reference image on my perspective viewport and pressing the keyboard shortcut Alt+b will show the viewport background then click the file and load the reference image. Check the display background and match bitmap then press ok.

At first I can only see partial area of the image the reason why is I haven’t configured the output size yet, to fix this I copied the width and the height of my reference image it’s around 624×1000 and paste it on the output size in render scene dialog box. Make sure to turn on the image aspect ratio, the one with the lock icon so whenever you want to change the output size for test rendering purposes you’ll still have the same aspect ratio. After that activate the safe frame mode by pressing the shortcut Shift+f, now that’s more like it.

Now let’s create a camera in the scene. I added camera on the front viewport, move it to zero point and set the z axis to an average human height about 150cm. off the ground. I turn on the show horizon on my camera so I can align it well with the reference image horizon by rotating the camera. Now I need to know what kind of lens is to be use in my camera so I started out by using 35mm lens and since the reference image doesn’t have any tapering effect on its z axis I assumed that it is a 2 point perspective so I need to add a camera correction. Select the camera, click the right button of the mouse and the quad menu will appear then you will find the camera correction in the tools 1.


Latest Comments