“Cheese Platter ” by Hau Ming (Jamie) Li
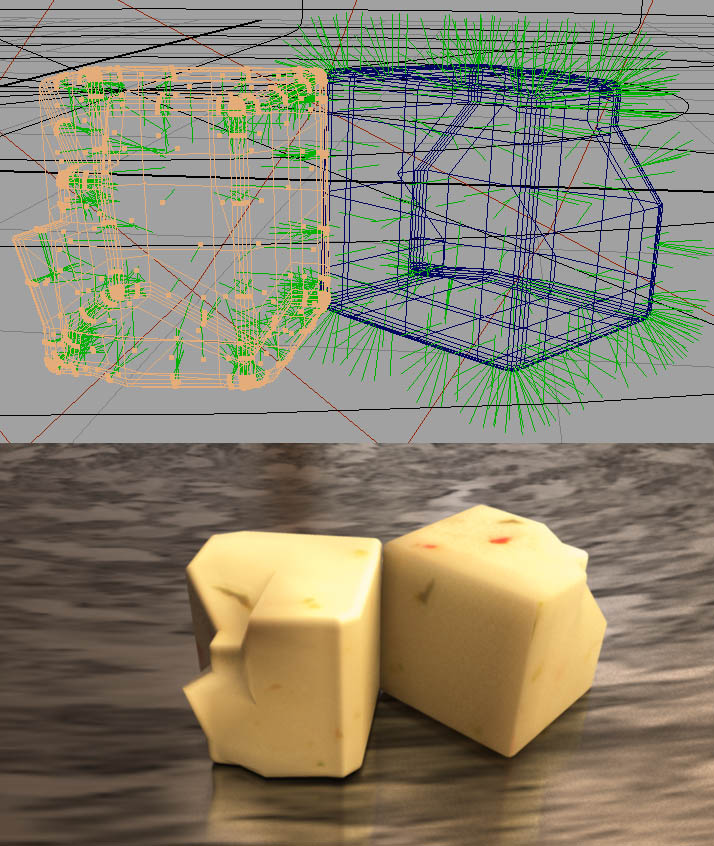
The reason why I said it is important to check your normals earlier was because NURBS have a tendency to have normals facing inwards. If the normals are facing in, light cannot scatter throughout the object and you would not be able to see the real details of the texture maps. Notice in the left picture below, the cheese cube looks dry and you can barely see the textures, even with a specular map, versus the picture on the right, in which the cheese cube looks more detailed, wet and translucent.

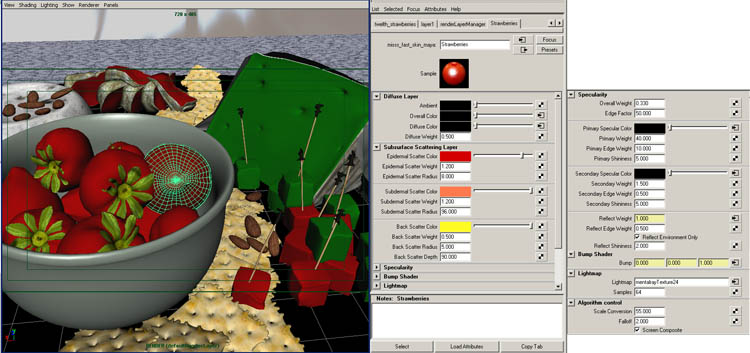
For all the cheeses and strawberries, I used the Maya’s Skin Shader instead of the simple fast shader because of the control for the specularity and reflectivity attributes.
Overall is a tint.
Diffuse and Epidermal attributes multiply each other.
Subdermal and Back Scatter attributes are where you control how translucent you want your object to be. I found it is mostly the Subdermal weight that you have to play with to get an object more translucent.
Primary specularity is where I put the specular map I created using different size brushes , and then tinted it very light blue in the color gain of the strawberry primary specularity.
Secondary specularity is where I put a black and white noise map to break the highlight of the strawberries.
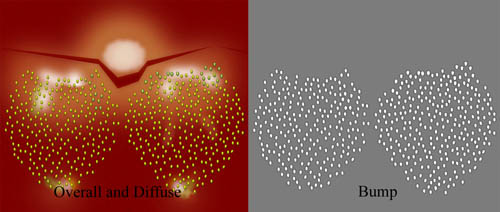
Since people kept asking me about the strawberries, I’ll tell you how I did it in Photoshop. For the Color Map of the strawberries, I cropped a good looking seed, individually place them on the UV layout for the imperfections, then I duplicated the jpeg seeds several times and merged visible. I did that so the seeds won’t have that pixilated look from the jpegs that I got on the internet. Next I used the brightness and contrast from Photoshop and beveled them so the seeds can have that curvy popped out look without using geometries. For the base color, I sampled the redness of one of the photos, added noise and gaussium blur. Next, I painted the rawness of the strawberry’s white and green color, blurred and blended in Photoshop. For the Bump Map, I duplicated the seed layer, inverted it to have the bump up look, then I duplicated again and turned them into black and gaussium blurred it and put that layer under the white bump up layer. This will give the look of the dentedness with the seeds popped out. For the Primary Specular Map, I used different size brushes and randomly paint it onto the UV layout. As for the Secondary Specular Map, I used a noise filter, played around with the level, brightness and contrast, duplicated the layers several times, merged the layers. This is important, because Maya can’t seem to be able to show the white specs of the noise in the attribute editor when I plugged it into the Secondary Specular Color. So what I did was to bring more of the whiteness out in the noise map so I can see it in the attribute editor. Here are the Color and Bump maps of the strawberries and the Skin Shader attribute:


Latest Comments