“Astronaut” by Adel Adili

By using patch-modelling in Max the artist can create complicated stuff as organic models.
Here you can see the head of the astronaut which was done in Max 3.1 and of course one has to have experience in 2D & 3D spline modeling and be familiar with the Vertex Bezier and Corner and where to use them, for example. One of the important points here is that the cells which make up a net created from the spline design should be at least a triangle and in the perfect state a square, and this process should be completed by assigning a “Surface”-modifier, the spline is then replaced by a skin, but if the spline model contains more sides in some parts the result won’t come out at all. The pictures can show this process. Also you can download the Max file.
In the following you can learn more about 2D&3D splines.
1. Good skin
2. Perfect Skin
3. Doesn’t lead to skin…

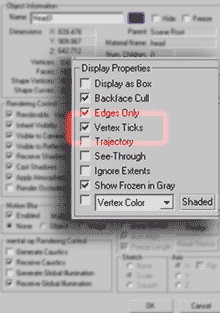
In 2D&3D spline modelling in MAX, special tools should be used. One of the points is that the vertices should be visible. We have to go to “Spline Property” and checkmark the “Vertex Ticks” (the image on the left), also snap should be fully used here, so click on “Snap Toggle” then right click so Grid and Snap Settings are displayed, then only by activating “Endpoint” the environment is ready for 2D&3D spline modeling.
![]()

In the stage below we can see how by clicking on the Create panel, then turning on Shapes and clicking Line, the base splines are drawn on the X,Y,Z axis to start the head design.Then we need to draw other splines. Here we just need to design half of the head.To see more download this Max file. 


I prefered to add a Relax modifier to the layers of the model and UVW mapping was assigned to it in cylindrical way.

The image above shows the layers used in modifier histyory (stack).
To have the best possible mapping we have to use the “UVW Unwrap” modifier .
Now in this stage the drawing of the model is completed. All the splines should be attached but better not welded because the result might be different, then a mirror is cloned from it (image on the left). The selected red spline is deleted. By using vertex snap the two headhalves come close so that the vertices of their two edges meet eachother and overlap. Again all the splines should be attached but better not welded.
In this stage the web spline is completed. Now by adding a “Surface”-modifier the model becomes a patch.

All maps used on the head are presented here:
1 – Diffuse map
2 – Bump map
3 – Specular map
After adding the eyes and the glasses the head is completed. By editing the splines ar the bottom of the modifier history, different gestures of face can be set and can also be used for morphs.

3Dtutorials.sk recommendation:
To maximise the realism of your 3D characters we recommend to use high quality human photo textures from the #1 texture website www.3D.sk

This is another character I made with the same method in Max3.1. The texture is more complicated, so I used lots of layers in multitexture channels. You can see two of these textures below, one of which is Diffuse and the other a Bump map. Above you can see the model in 3 phases. The right shows the patch net, the middle is without material and textures and the one on the left is the completed model.

(c) Adel Adili, www.adel3d.com


Latest Comments